목표
- Spring MVC Architecture를 이해한다.
- 기본 Project Structure을 이해한다.
- Spring MVC에서 Model, View, Controller 의 사용법을 이해한다.
- Model
- View
- Controller
- Spring MVC를 위한 필수적인 기본 설정 방법과 개념을 이해한다.
- Maven Configuration (pom.xml)
- Web Deployment Descriptor(web.xml)
- Spring MVC Configuration
Spring MVC Architecture
- Model
- 애플리케이션 상태(data)를 나타낸다.
- 일반적으로 POJO로 구성된다.
- Java Beans
- View
- 디스플레이 데이터 또는 프리젠테이션
- Model data의 렌더링을 담당하며, HTML output을 생성
- JSP
- Controller
- View와 Model 사이의 인터페이스 역할
- Model/View에 대한 사용자 입력 및 요청을 수신하여 그에 따라 적절한 결과를 Model에 담아 View 에 전달한다.
- 즉, Model Object와 Model을 화면에 출력할 View Name을 반환한다.
- Controller -> Service -> Dao -> DB
- Servlet
Spring Framework가 제공하는 Class
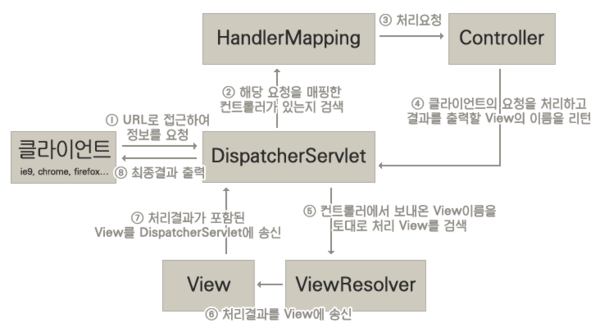
- DispatcherServlet
- Spring Framework가 제공하는 Servlet 클래스
- 사용자의 요청을 받는다.
- Dispatcher가 받은 요청은 HandlerMapping으로 넘어간다.
- HandlerMapping
- 사용자의 요청을 처리할 Controller를 찾는다.(Controller URL Mapping)
- 요청 url에 해당하는 Controller 정보를 저장하는 table을 가진다.
- 즉, 클래스에 RequestMapping("/url") annotation 을 명시하면 해당 URL에 대한 요청이 들어왔을 때 table에 저장된 정보에 따라 해당 클래스 또는 메서드에 Mapping한다.
- ViewResolver
- Controller가 반환한 View Name에 prefix, suffix를 적용하여 View Object를 반환한다.
- 예를 들어 view name : home, prefix : /WEB-INF/views/, suffix : .jsp 는 "/WEB-INF/views/home.jsp" 라는 위치의 View(JSP)에 Controller에게 받은 Model을 전달한다.
- 이 후에 해당 View에서 이 Model data를 이용하여 적절한 페이지를 만들어 사용자에게 보여준다.
기본 Project Structure
WebApplication Structure (웹 서비스 기본 설정 구조)
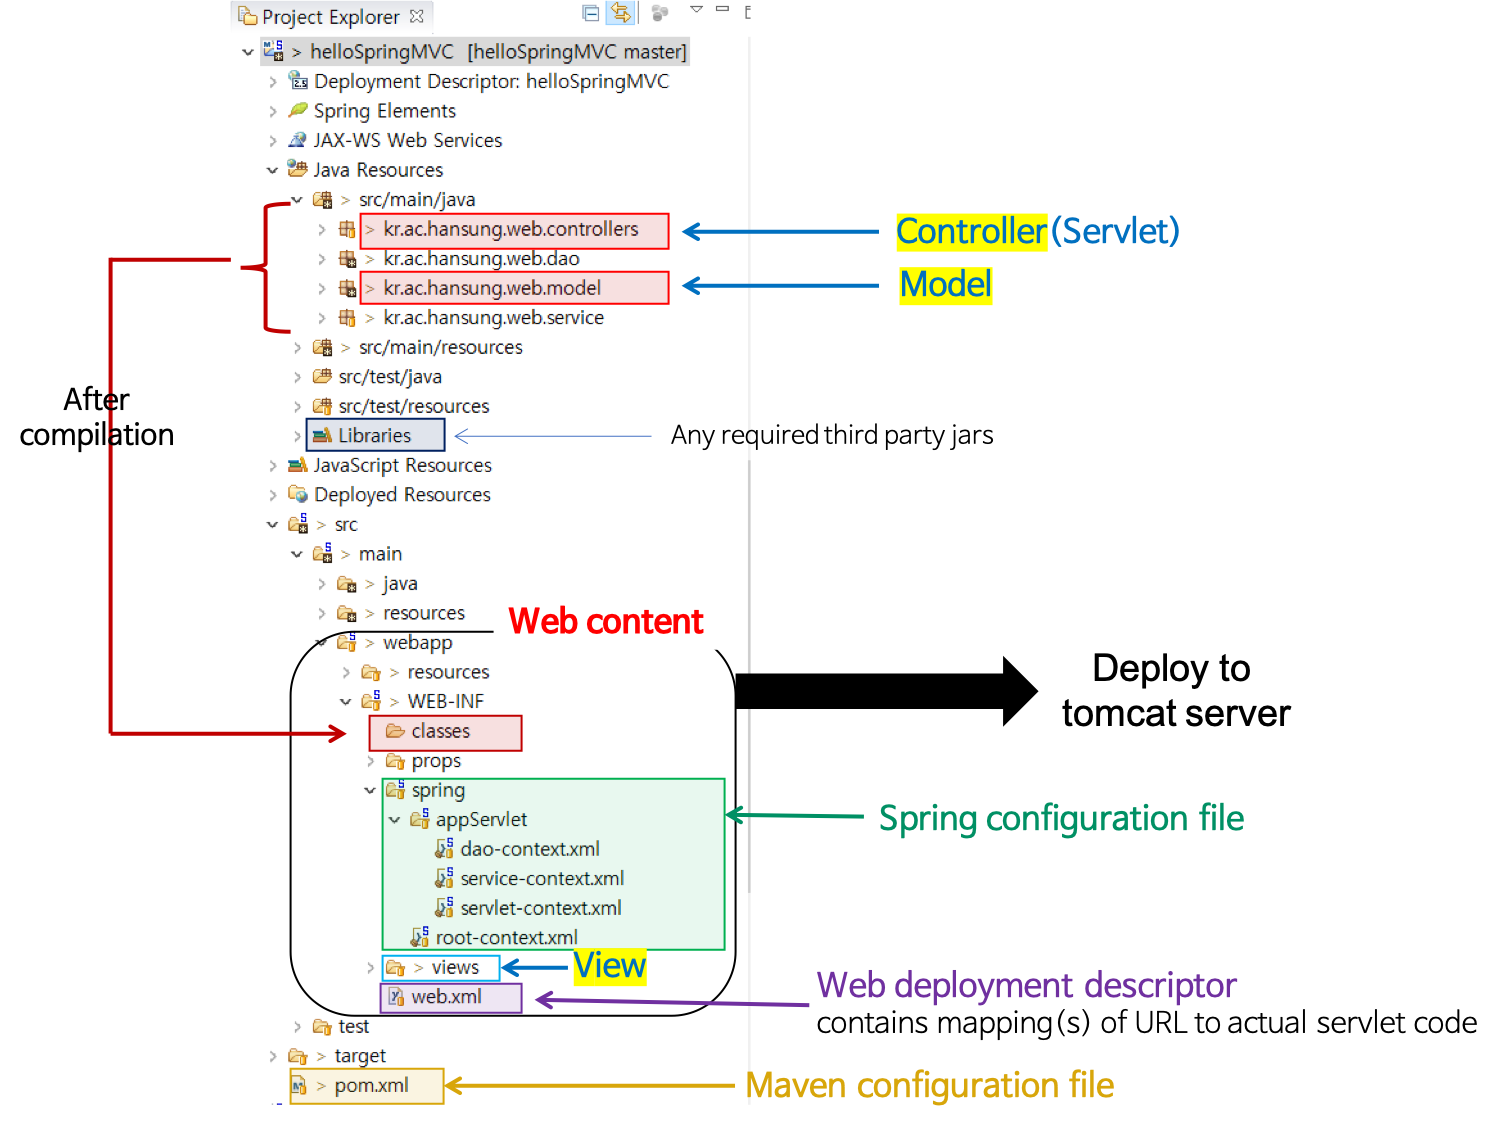
- src
- 개발자가 작성한 Servlet 코드가 저장된다.
- Controller, Model, Service, Dao
- src/main/java
- 개발되는 Java 코드의 경로
- src/main/resources
- 서버가 실행될 때 필요한 파일들의 경로
- src/test/java
- 테스트 전용 경로 (각 테스트 코드 작성 경로)
- src/test/resource
- 테스트 시에만 사용되는 파일들의 경로
- Libraries
- Servlet이나 JSP에서 추가로 사용되는 라이브러리 또는 드라이버
- jar로 압축한 파일이어야 한다.
- WebContent (전체 ROOT) - webapp
- Deploy할 때 WebContent 디렉터리 전체가 .war 로 묶어서 보내진다.
- resource
- 정적인 데이터 (ex. image file, css, js, fonts)
- WEB-INF
- classes : 작성한 Java Servlet 파일이 나중에 .class로 이곳에 모두 저장된다.
- lib : 추가한 모든 라이브러리 또는 드라이버가 이곳에 저장된다.
- props : property file을 저장한다.
- spring : spring configuration files을 저장한다. (Spring 과 관련된 설정 파일을 모아둔 것)
- dispatcher-servlet.xml
- applicationContext.xml
- dao-context.xml, service-context.xml 등
- views : Controller와 매핑되는 .jsp 파일들을 저장한다.(JSP 파일의 경로)
- web.xml : web application의 설정을 위한 web deployment descriptor
- DispatcherServlet, ContextLoadListener 설정
- pom.xml
- maven configuration file
- 어떤 lib을 쓸지 명시한다.
Spring MVC에서 Model, View, Controller
Model
- Controller에서 View로 객체를 전달하는데 사용된다.
- 명명된 객체들의 집합이라고 할 수 있다.
- Key-Value 형식의 하나의 쌍을 명명된 객체라고 부른다.
- 또한 이 명명된 객체는 model attribute라고 부른다.
- 여러 개의 attribute가 모여 Table 형식을 이룬다.
- view에서 attribute의 key 값을 통해 value 값을 사용할 수 있다.
Model Inplementation
-
Model을 표현하기 위해 여러 자료구조를 사용할 수 있다.
-
Controller 메서드에 input argument로 값을 넣어주면 Spring Framework가 자동으로 Model을 만들어주고 해당 Model의 주솟값만 넘겨준다.
-
java.util.map의 구현
@RequestMapping("/greeting") public String getGreeting(Map<String, Object> model) { String greeting = service.getRandomGreeting(); model.put("greeting", greeting); return "home"; }- service 객체의 메서드를 호출하여 결과를 가져온다.
- model에 첫 번째 인자 "name"과 결과에 대한 값인 두 번째 인자 value를 넣는다.
- view에서 해당 이름 ("name")으로 value에 접근한다.
- 해당하는 value를 보여줄 View name을 반환한다.
-
Spring에서 제공하는 Model 인터페이스 구현
@RequestMapping("/special-deals") public String getSpecialDeals(Model model) { List<SpecialDial> specialDeals = service.getSpecialDeals(); model.addAttribute(specialDeals); // value만 넣으면 name은 자동 생성 return "home"; }- Map을 사용하는 것의 단점은 "name"을 반드시 지정해야하는 것이다.
- Model 인터페이스는 addAttribute() 와 같은 편리한 메소드를 제공한다.
- addAttribute()는 Map 속성의 이름 ("name")을 자동으로 생성한다는 점을 제외하면 Map의 put()과 동일하다.
- 자동으로 생성하고 싶지 않는 모델의 속성 이름을 결정하는 것 여전히 가능하다.
- 가장 자주 사용하는 Model 형식
-
Spring 에서 제공하는 ModelMap 객체
@RequestMapping("/fullname") public String getFullname(ModelMap model) { // chained calls are handy! model.addAttribute("name", "Jon") .addAttribute("surname", "Snow"); return "home"; }- 추가적인 기능을 제공한다.
- chain으로 사용 가능
- 추가적인 기능을 제공한다.
Controller
@Controller
public class HomeController {
    private static final Logget Logger = LoggerFactory.getLogger(HomeController.class);

    @RequestMapping(value = "/home", method = RequestMethod.GET)
    public String home(Locale locale, Model model) {
        Logger.info("Welcome {}.", locale);

        // Business Logic
        Date date = new Date();
        DateFormat = dateFormat = DateFormat.getDateTimeInstance(DateFormat.LONG, DateFormat.LONG, locale);
        String formattedDate = dateFormat.format(date);

        // BL의 결과를 Model에 저장
        model.addAttribute("serverTime", formattedDate);

        // Return logical view name
        return "home";
    }

    @RequestMapping(value = "/login", method = RequestMethod.GET)
    public String doLogin(@RequestParam String username, @RequestParam String password) {
        ...
        return success;
    }
}-
Controller
- bean으로 등록
- 해당 클래스가 Controller로 사용됨을 Spring Framework에 알림
- @Component -구체화-> @Controller, @Service, @Repository
-
@RequestMapping
-
value : 해당 url로 요청이 들어오면 이 메서드가 수행된다.
-
method : 요청 method를 명시한다.
-
즉, 위의 예시에서는 "/home" url로 HTTP GET 요청이 들어오면 home() 메서드가 실행된다.
@Controller @RequestMapping("/home") // 1) Class Level public class HomeController { /* an HTTP GET for /home */ @RequestMapping(method = RequestMethod.GET) // 2) Handler Level public String getAllEmployees(Model model) { ... } /* an HTTP POST for /home/employees */ @RequestMapping(value = "/employees", method = RequestMethod.POST) public String addEmployee(Employee employee) { ... } }- 1) Class Level Mapping
- 모든 메서드에 적용되는 경우
- "/home"로 들어오는 모든 요청에 대한 처리를 해당 클래스에서 한다는 것을 의미한다.
- 2) Handler Level Mapping
- 요청 url에 대해 해당 메서드에서 처리해야 되는 경우
- "/home/employees" POST 요청에 대한 처리를 addEmployee()에서 한다는 것을 의미한다.
- 1) Class Level Mapping
-
model.addAttribute()
- Business Logic의 처리 결과 값을 model attribute에 지정하면 Spring이 Model 객체를 만들어 해당 Model의 주솟값을 넘겨준다.
- 하나의 요청 안에서만 Controller와 View가 Model을 공유한다.
-
@RequestParam
- HTTP GET 요청에 대해 매칭되는 request parameter 값이 자동으로 들어간다.
- Ex)
http://localhost:8080/login?username=scott&password=tiger
-
View
- View를 생성하는 방법은 여러 가지가 있다.
- JSP 이외에도 Thymeleaf, Groovy, Freemarker 등 여러 TempateEngine이 있다.
- JSP(Java Server Pages)
- JSP 제한사항
- Java EE에 종속적이라는 단점이 있다.
- SpringBoot에서는 공식적으로 jsp를 지원하지 않는다.
- SpringBoot의 내장 Tomcat에 하드코딩 패턴때문에 jar 형식으로는 webapp 내용을 가져올 수 없다.
- 따라서 SpringBoot 에서는 war가 아닌 jar로 사용할 때는 jsp를 사용할 수 없다.
- JSTL(JSP Standard Tag Library)
- 많은 JSP 애플리케이션의 공통적인 핵심 기능을 캡슐화하는 유용한 JSP 태그 모음
- 즉, JSP 페이지를 작성할 때 유용하게 사용할 수 있는 여러 가지 action 과 함수가 포함된 라이브러리
- 가장 많이 사용되는 태그 확장 라이브러리
- 자신만의 Custom Tag 를 추가할 수 있는 기능을 제공한다.
- 사용하는 이유?
- JSP에 Java Code가 들어가는 것을 막기 위해 사용된다.
- 즉, Java Code(JSP Scriptlet) 대신 Tag를 사용하여 프로그래밍 할 수 있도록 하기 위해 도입되었다.
Spring MVC를 위한 필수 설정
-
Maven Configuration (pom.xml)
- 사진의 프로젝트에 대한 고유의 좌표 설정
- groupId
- 자신의 프로젝트를 고유하게 식별하게 해 주는 것으로, 최소한 내가 컨드롤하는 domain name이어야 한다.
- package 명명 규칙을 따른다.
- 하위 그룹은 얼마든지 추가할 수 있다.
- artifactId
- 제품의 이름으로, 버전 정보를 생략한 jar 파일의 이름이다.
- 프로젝트 이름과 동일하게 설정한다.
- 소문자로만 작성하며 특수문자는 사용하지 않는다.
- version
- SNAPSHOT : 개발용, RELEASE : 배포용
- 숫자와 점을 사용하여 버전 형태를 표현한다.(1.0, 1.1, 1.0.1, ...)
- groupId
- Maven 장점
- pom.xml에 명시한 lib를 자동으로 다운
- build process 자동화
- compile -> test -> package(.war) -> install -> deploy
- 사진의 프로젝트에 대한 고유의 좌표 설정
-
Web Deployment Descriptor (web.xml)
- 개념
- web application의 설정을 위한 deployment descriptor
- SUN에서 정해놓은 규칙에 맞게 작성해야 하며 모든 WAS에 대하여 작성 방법이 동일하다.
- 역할
- Deploy할 때 Servlet의 정보를 설정해준다.
- 브라우저가 Java Servlet에 접근하기 위해서는 WAS(Ex. Tomcat)에 필요한 정보를 알려줘야 해당하는 Servlet을 호출할 수 있다.
- 정보 1) 배포할 Servlet이 무엇인지
- 정보 2) 해당 Servlet이 어떤 URL과 매핑되는지
- 구체적인 설정 내용
- DispatcherServlet
- ContextLoaderListener
- Filter : encodingFilter, springSecurityFilterChain
- 개념
   <?xml version="1.0" encoding="UTF-8"?>
   <web-app version="2.5" xmlns="http://java.sun.com/xml/ns/javaee" xmlns:xsi="http://www.w3.org/2001/XMLSchema-instance" xsi:schemaLocation="http://java.sun.com/xml/ns/javaee; http://java.sun.com/xml/ns/javaee/web-app_2.5.xsd">

   <context-param>
       <param-name>contextConfigLocation</param-name>
       <param-value>
           /WEB-INF/spring/service-context.xml
           /WEB-INF/spring/dao-context.xml
           /WEB-INF/spring/security-context.xml
           /WEB-INF/spring/applicationContext.xml
       </param-value>
   </context-param>
   <listener>
       <listener-class>org.springframework.web.context.ContextLoaderListener</listener-class>
   </listener>

   <servlet>
       <servlet-name>dispatcher</servlet-name>
       <servlet-class>org.springframework.web.servlet.DispatcherServlet</servlet-class>
       <init-param>
           <param-name>contextConfigLocation</param-name>
           <param-value>/WEB-INF/spring/dispatcher-servlet.xml
           </param-value>
       </init-param>
       <load-on-startup>1</load-on-startup>
   </servlet>
   <servlet-mapping>
       <servlet-name>dispatcher</servlet-name>
       <url-pattern>/</url-pattern>
   </servlet-mapping>

   <filter>
       <filter-name>encodingFilter</filter-name>
       <filter-class>org.springframework.web.filter.CharacterEncodingFilter
       </filter-class>
       <init-param>
           <param-name>encoding</param-name>
           <param-value>UTF-8</param-value>
       </init-param>
       <init-param>
           <param-name>forceEncoding</param-name>
           <param-value>true</param-value>
       </init-param>
   </filter>
   <filter-mapping>
       <filter-name>encodingFilter</filter-name>
       <url-pattern>/*</url-pattern>
   </filter-mapping>

   <filter>
       <filter-name>springSecurityFilterChain</filter-name>
       <filter-class>org.springframework.web.filter.DelegatingFilterProxy
       </filter-class>
   </filter>
   <filter-mapping>
       <filter-name>springSecurityFilterChain</filter-name>
       <url-pattern>/*</url-pattern>
   </filter-mapping>
</web-app>-
Spring MVC Configuration Files
-
dispatcher-servlet.xml
-
주요 설정 내용 : Controller 관련, ViewResolver, mvc:annotation-driven설정 등
-
Annotation 활성화
<mvc:annotation-driven /> -
Component 패키지 설정
<context:component-scan base-package="controller"/>-
이 패키지를 스캔하며 annotation이 달린 것을 bean으로 생성하여 Container에 담아둔다.
-
참고) 이 내용은 service, dao 설정에도 필요하다.
-
<context:component-scan base-package="service"> -
<context:component-scan base-package="dao">
-
-
-
정적인 data 위치 mapping
<mvc:resources mapping="/resources/**" location="/resources/" /> 또는 <mvc:resources mapping="/static/**" location="/static/" />- web/resources/ 하위에 정적인 데이터(css, js, img, font)가 존재
- Controller가 처리할 필요 없이 해당 위치의 디렉터리에서 바로 접근할 수 있다.
- HTTP GET 요청에서의 정적인 data에 바로 매핑이 가능하다.
-
ViewResolver
<bean class="org.springframework.web.servlet.view.InternalResourceViewResolver">
  <property name="prefix" value="/WEB-INF/views/"/>
  <property name="suffix" value=".jsp"/>
</bean>
-
-
applicationContext.xml
-
주요 설정 내용 : DataSource관련, properties 등록, SessionFactory, TransactionManager 등
-
properties 등록
<context:property-placeholder location="/WEB-INF/props/jdbc.properties" /> 동일 <context:property-placeholder location="classpath:props/jdbc.properties" />- properties file에서 읽어와 주입한다.
-
DataSource 주입
<bean id="dataSource" class="org.apache.commons.dbcp.BasicDataSource" destroy-method="close"> <property name="driverClassName" value="${jdbc.driverClassName}" /> <property name="url" value="${jdbc.url}" /> <property name="username" value="${jdbc.username}" /> <property name="password" value="${jdbc.password}" /> </bean> -
어노테이션에 기반한 트랜잭션 동작의 설정을 활성화
<tx:annotation-driven /> -
Session Factory 등록 및 Transaction Manager 설정
 <bean id="sessionFactory"
      class="org.springframework.orm.hibernate5.LocalSessionFactoryBean">
      <property name="dataSource" ref="dataSource"></property>
      <property name="packagesToScan">
          <list>
              <value>com.spring.model</value>
          </list>
      </property>
      <property name="hibernateProperties">
          <props>
              <prop key="hibernate.dialect">org.hibernate.dialect.MySQLDialect</prop>
              <prop key="hibernate.hbm2ddl.auto">update</prop>
              <prop key="hibernate.show_sql">true</prop>
              <prop key="hibernate.format_sql">false</prop>
          </props>
      </property>
  </bean>

  <bean id="transactionManager"
      class="org.springframework.orm.hibernate5.HibernateTransactionManager">
      <property name="sessionFactory" ref="sessionFactory"></property>
  </bean>
-
-
-
service-context.xml
-
주요 설정 내용 : Service 관련
-
Component 패키지 설정
-
<context:component-scan base-package="service"/> -
이 패키지를 스캔하며 annotation이 달린 것을 bean으로 생성하여 Container에 담아둔다.
-
-
-
dao-context.xml
-
주요 설정 내용 : DAO 관련
-
Component 패키지 지정
-
<context:component-scan base-package="dao"/> -
이 패키지를 스캔하며 annotation이 달린 것을 bean으로 생성하여 Container에 담아둔다.
-
-
-
security-context.xml
-
주요 설정 내용 : Security관련, BCryptPasswordEncoder 등
<security:authentication-manager>
    <security:authentication-provider>
        <security:jdbc-user-service
            data-source-ref="dataSource"
            users-by-username-query="select username, password, enabled from users where username=?"
            authorities-by-username-query="select username, authority from users where username=?" />
        <security:password-encoder ref="passwordEncoder"></security:password-encoder>
    </security:authentication-provider>
</security:authentication-manager>

<security:http auto-config="true" use-expressions="true">
    <security:intercept-url pattern="/admin/**" access="hasRole('ROLE_ADMIN')" />
    <security:form-login login-page="/login" authentication-failure-url="/login?error" />
</security:http>

<bean id="passwordEncoder"
    class="org.springframework.security.crypto.bcrypt.BCryptPasswordEncoder">
</bean>
-
참고 블로그
https://gmlwjd9405.github.io/2018/12/20/spring-mvc-framework.html
'JAVA > 지식' 카테고리의 다른 글
| [자바 예외 구분] Checked Exception, Unchecked Exception (0) | 2021.03.04 |
|---|---|
| [AOP] weaver options (0) | 2021.03.03 |
| 객체(Object), 클래스(Class), 인스턴스(Instance) 간략하게 정리 (0) | 2021.03.01 |
| [접근 지정자] protected, default 의 차이 (0) | 2021.03.01 |
| [Spring Boot annotion] @Bean, @Configuration, @Component (0) | 2021.03.01 |